

Last time, we did a deeper dive into how Keboola Storage works, how applications process it, and how it stores data during a flow. Today, I’ll show you how transformations work in Keboola. We’ll create a much more complex Flow that calculates data from a source, utilizes Keboola transformation and then updates a Power BI report.
Keboola Transformation (ETL Approach)
Transformations are the main building block of the ETL (extract, transfer, load) approach in Keboola. To recap:
- ETL data processing concept: You first extract from the source system at the batch level, then process and transform the data (into datasets, semantic models, etc.), and finally load the data into the target storage.
- ELT concept – The opposite approach is ELT, where the tool is used only for Extraction and Load, with transformation occurring afterward. The advantage here is that we can perform the transformation with another tool (such as dbt or database procedures) in a way that suits us.
Of course, we can use Keboola as an ELT tool (we can skip transformations). That’s an advantage of Keboola. Transformations can be found in the Menu under “Transformations”.

What Data Engineering Task Do We Have for This Article?
I’ve been thinking, how about this: Task: Create a data Flow consisting of the following steps:
- Fetch data from AdventureWorks
- Store raw data in Keboola Storage
- Then perform denormalization to produce a dataset for reporting (transformation)
- Store this dataset in our Snowflake instance
- Finally, update the Power BI report connected to the dataset from the previous step
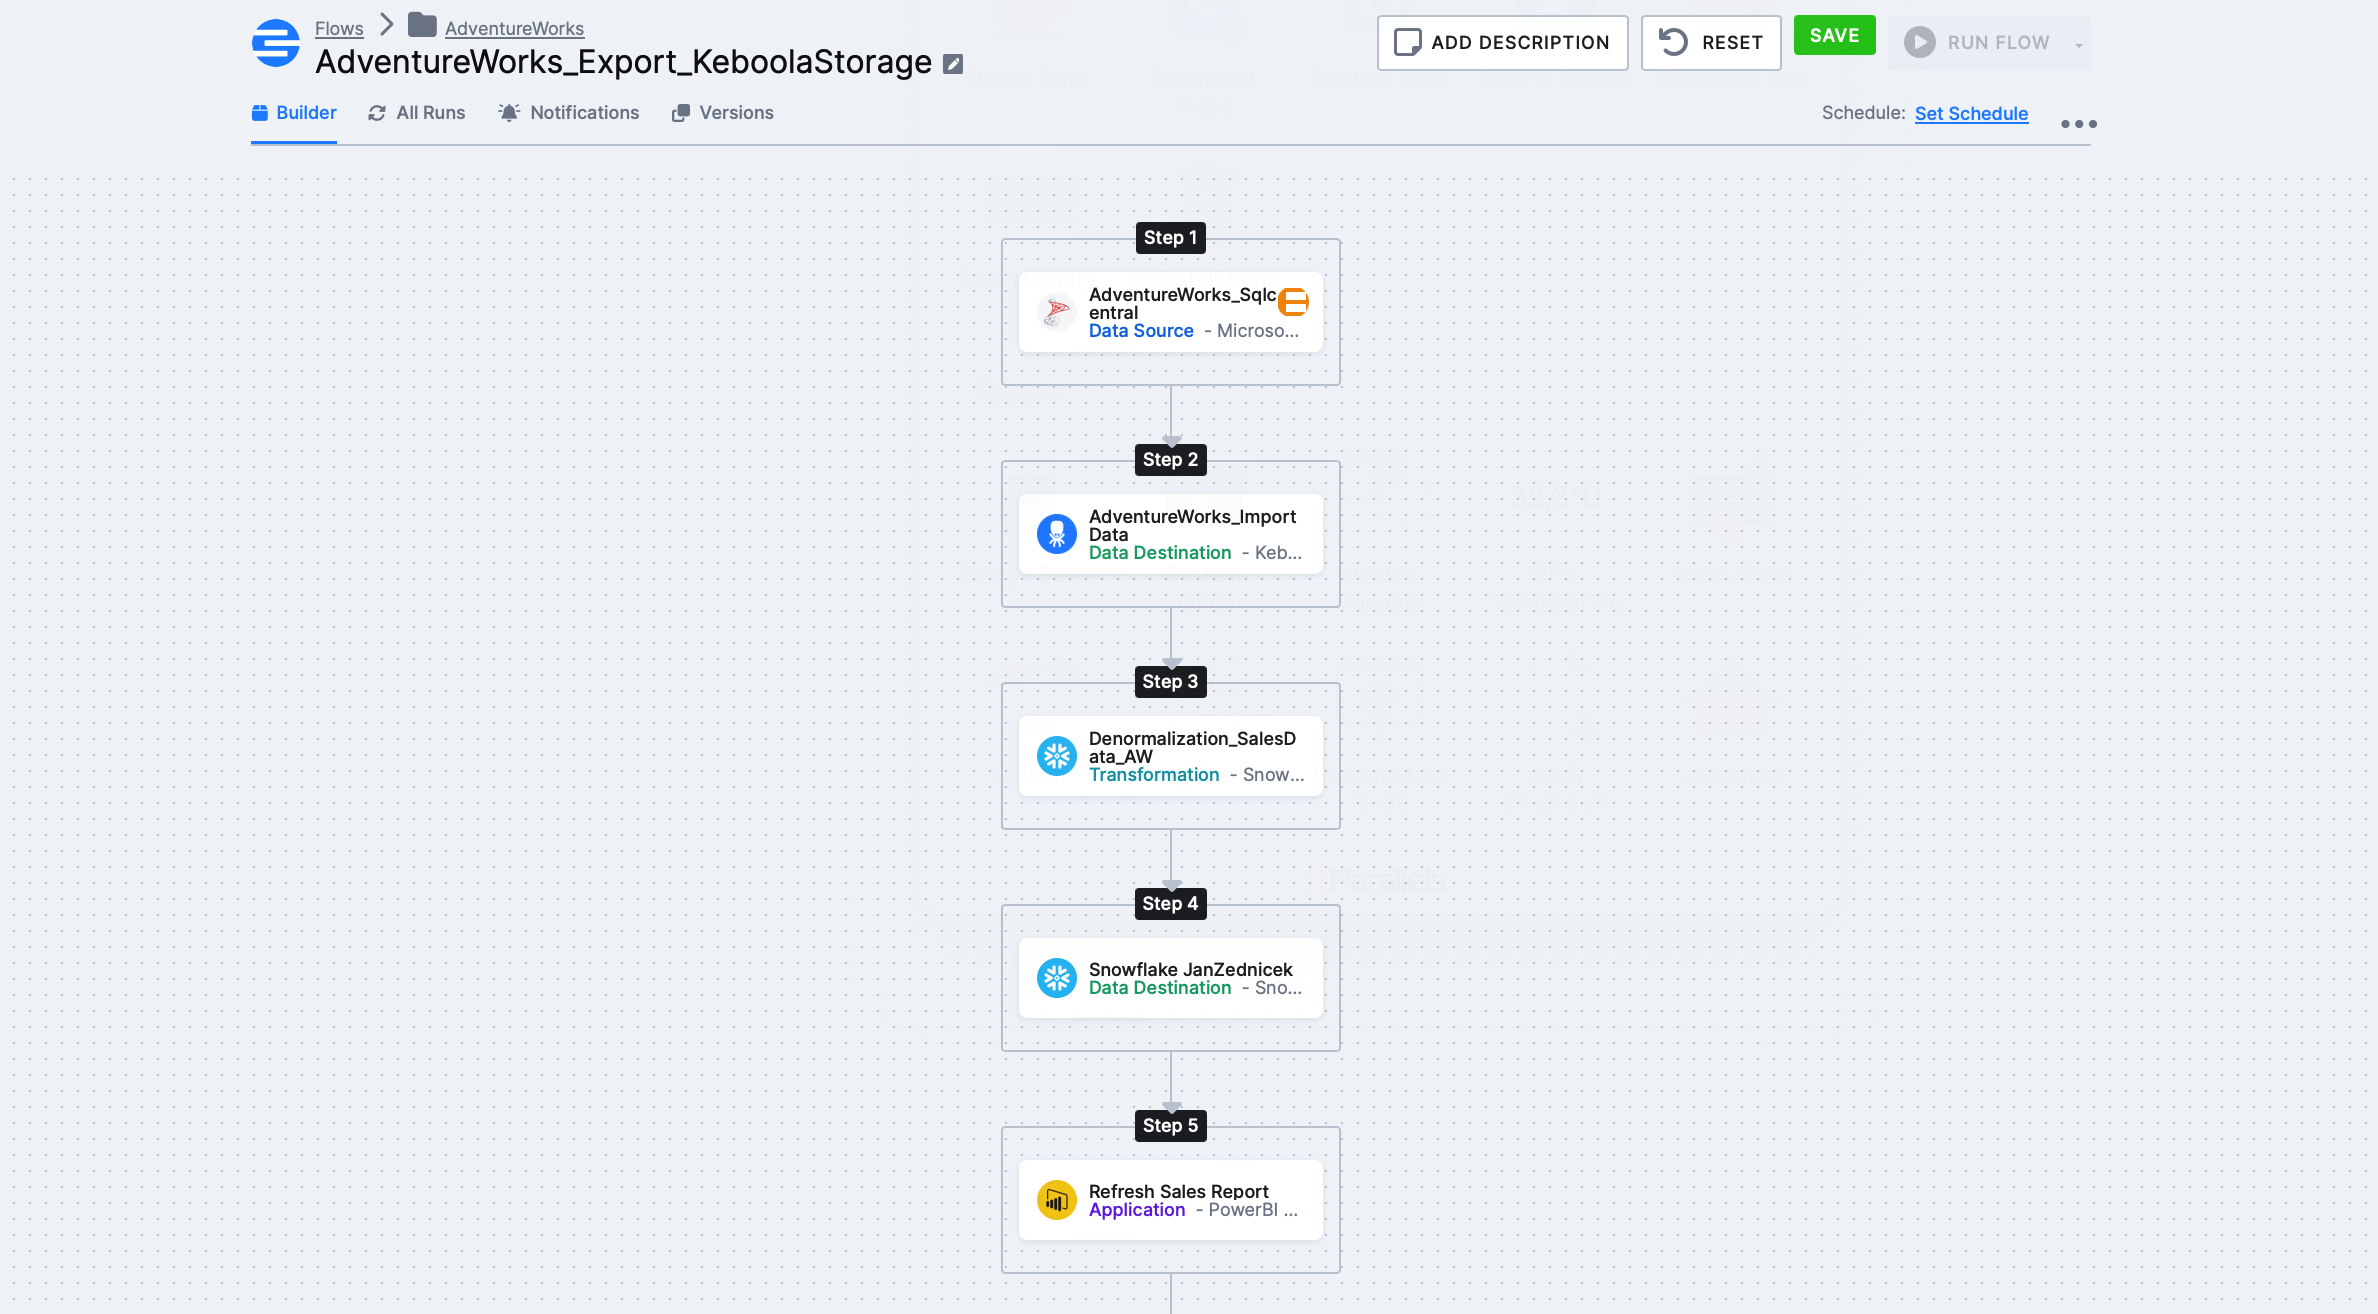
Ultimately, we need to get this flow, with Step 3 – Denormalization_SalesData_AW being our transformation, about which I’ll mainly write here. I’ve already covered other components (source, destination) in the previous article on Flow.
Types of Transformations in Keboola
Transformations work as a component within the flow. Typically, this transformation component follows extraction from source systems and takes data from Keboola Storage (IN bucket) as input. You’ll take this data into the transformation component and can do something with it.
Options for performing transformation:
- Python transformation
- R transformation
- Snowflake transformation
- No-code transformation
- dbt core transformation
The way you perform the transformation depends on your knowledge, solution architecture, and preferences.

We can prepare transformation scripts in so-called Workspaces.

These are workspaces that you create in the Keboola application and are very useful for many reasons. From the perspective of transformations, the workflow is roughly as follows:
- I want to make a transformation and need to debug the script somewhere
- I create a snowflake workspace
- Then you feed it with data (click tables from Keboola Storage to be uploaded to this space)
- You create a script and use this script in the transformation component
How to Create a Snowflake based Keboola Transformation?
Before I start writing the workflow, let’s look at our source data. Within our “AdventureWorks_sqlcentral” source component (see screenshot above – step 1) and subsequent “DataAdventureworks_importdata”, we’ll download data, which, after the extraction part, will be stored in Keboola Storage.

Step 1 – Creating the Transformation – Click on Transformations in the menu – create a new transformation and select Snowflake transformation.

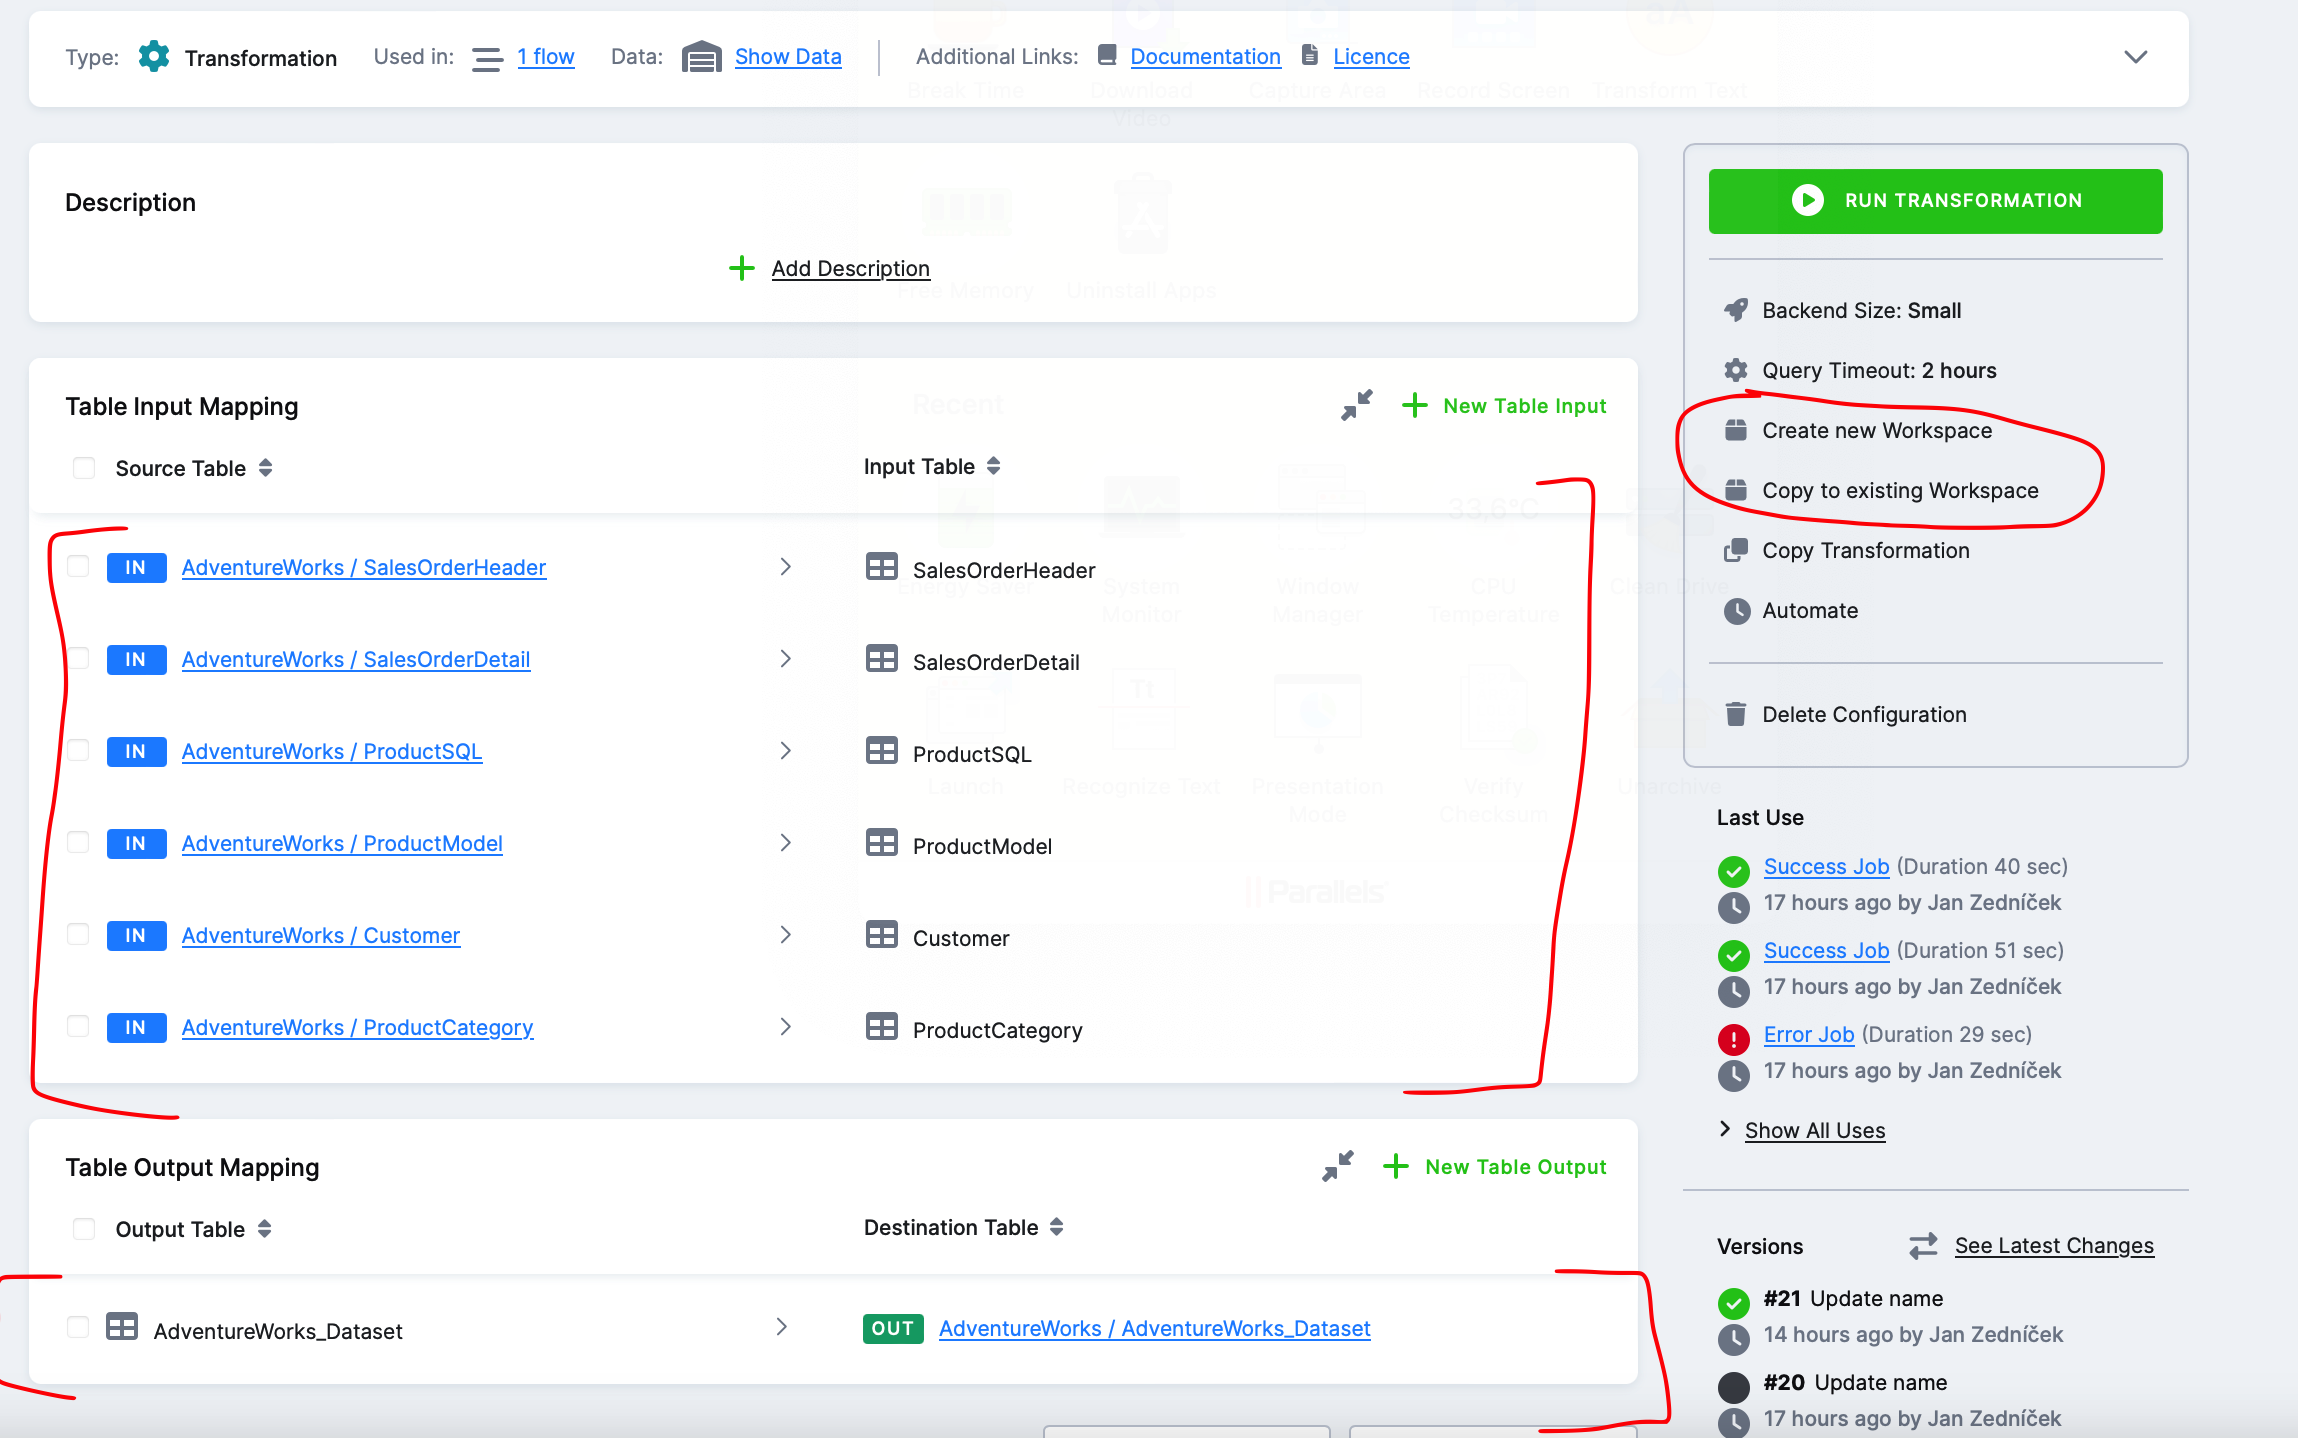
Step 2 – Filling the Transformation with Tables – Next, you need to set which tables from the Keboola backend (Snowflake) enter the transformation (IN) and exit (OUT). You’ll click this on the next screen. After selecting input and output tables, we need to put together an SQL script for that transformation. We won’t be inventing it from scratch. The option on the right is for this purpose – I can import tables into an existing workspace or create a new snowflake workspace.
Step 3 – Creating a Snowflake Workspace – Create a new snowflake workspace where you prepare scripts.

Step 4 – Logging into Snowflake Instance – Wait a moment until the environment is created in Snowflake, and once it’s done, Keboola will display login details. What just happened is that a database with our data and a user who has rights to this database were created in Keboola Snowflake backend.

Click on the host link and log in using the provided details. In the screenshot below, we see that everything is ready. We have a prepared database with our tables, and we can debug the script.

Step 5 – Script Preparation for Transformation – Open a new SQL worksheet in Snowflake and join tables into some meaningful dataset.

The script I used is below:
SELECT
“SalesOrderDetailID”
,”OrderQty”
,”UnitPrice”
,”UnitPriceDiscount”
,”LineTotal”
,”sh”.”AccountNumber”
,”cu”.”CompanyName”
,”cu”.”FirstName”
,”cu”.”LastName”
,”cu”.”EmailAddress”
,”sh”.”OrderDate”
,”pr”.”Name” AS “ProductName”
,”pm”.”Name” AS “ProductModel”
,”pc”.”Name” AS “ProductCategory”
FROM “SalesOrderDetail” “sd”
LEFT JOIN “SalesOrderHeader” “sh”
on “sd”.”SalesOrderID” = “sh”.”SalesOrderID”
LEFT JOIN “ProductSQL” “pr”
on “sd”.”ProductID” = “pr”.”ProductID”
LEFT JOIN “ProductModel” “pm”
on “pr”.”ProductModelID” = “pm”.”ProductModelID”
LEFT JOIN “ProductCategory” “pc”
on “pr”.”ProductCategoryID” = “pc”. “ProductCategoryID”
LEFT JOIN “Customer” “cu”
ON “sh”.”CustomerID” = “cu”.”CustomerID”;
Step 6 – Completing the Transformation Component – If the script is OK, return to the transformation component. The only thing to add is the DDL CREATE TABLE AS. During our Flow, the transformation will read data from tables, join them using the script, and then save the result using CREATE into Keboola storage. This allows us to access the transformation result in the next phase of our flow.

Step 8 – Completing the Flow – Once the transformation is done, we can proceed with further steps in our flow. We populate our database with data and then can load new data into our power bi report.
